
AxiTrace for Shopify
A complete walkthrough for connecting your Shopify store to AxiTrace. The setup is dramatically simpler than other platforms - type your store domain, click “Connect to Shopify”, approve the permissions screen, and the app auto-installs webhooks, the Web Pixel Extension, and ties everything to your AxiTrace workspace. About three minutes from blank to running.
- Before you start
- Open the Shopify integration in AxiTrace
- Enter your Shopify store domain
- Authorize AxiTrace in Shopify
- Confirm the connection
- Place a test order
- Verify events in your dashboard
- What gets tracked
- How purchases are captured and attributed
- Consent and customer privacy
- First-party tracking domains
- Disconnecting / reconnecting
- Troubleshooting
- FAQ
Before you start
You will need:
- An AxiTrace account with at least one workspace. Create one for free (10,000 visits/month, no card required).
- A Shopify store. Any plan works - Basic, Shopify, Advanced, Plus or development stores. AxiTrace does not gate on plan tier.
- Store owner or staff member with full permissions access in Shopify (to approve the OAuth scopes shown during install).
- About 3 minutes.
Unlike WooCommerce, the Shopify integration requires zero copy-pasting of public keys and no plugin install through your theme. Everything happens through Shopify’s OAuth flow. Once you authorise the app, AxiTrace registers the webhooks and creates the Web Pixel automatically - the workspace public key is injected into the pixel for you behind the scenes.
Open the Shopify integration in AxiTrace
- Sign in at axitrace.com/login.
- Click the workspace you want to connect to your store.
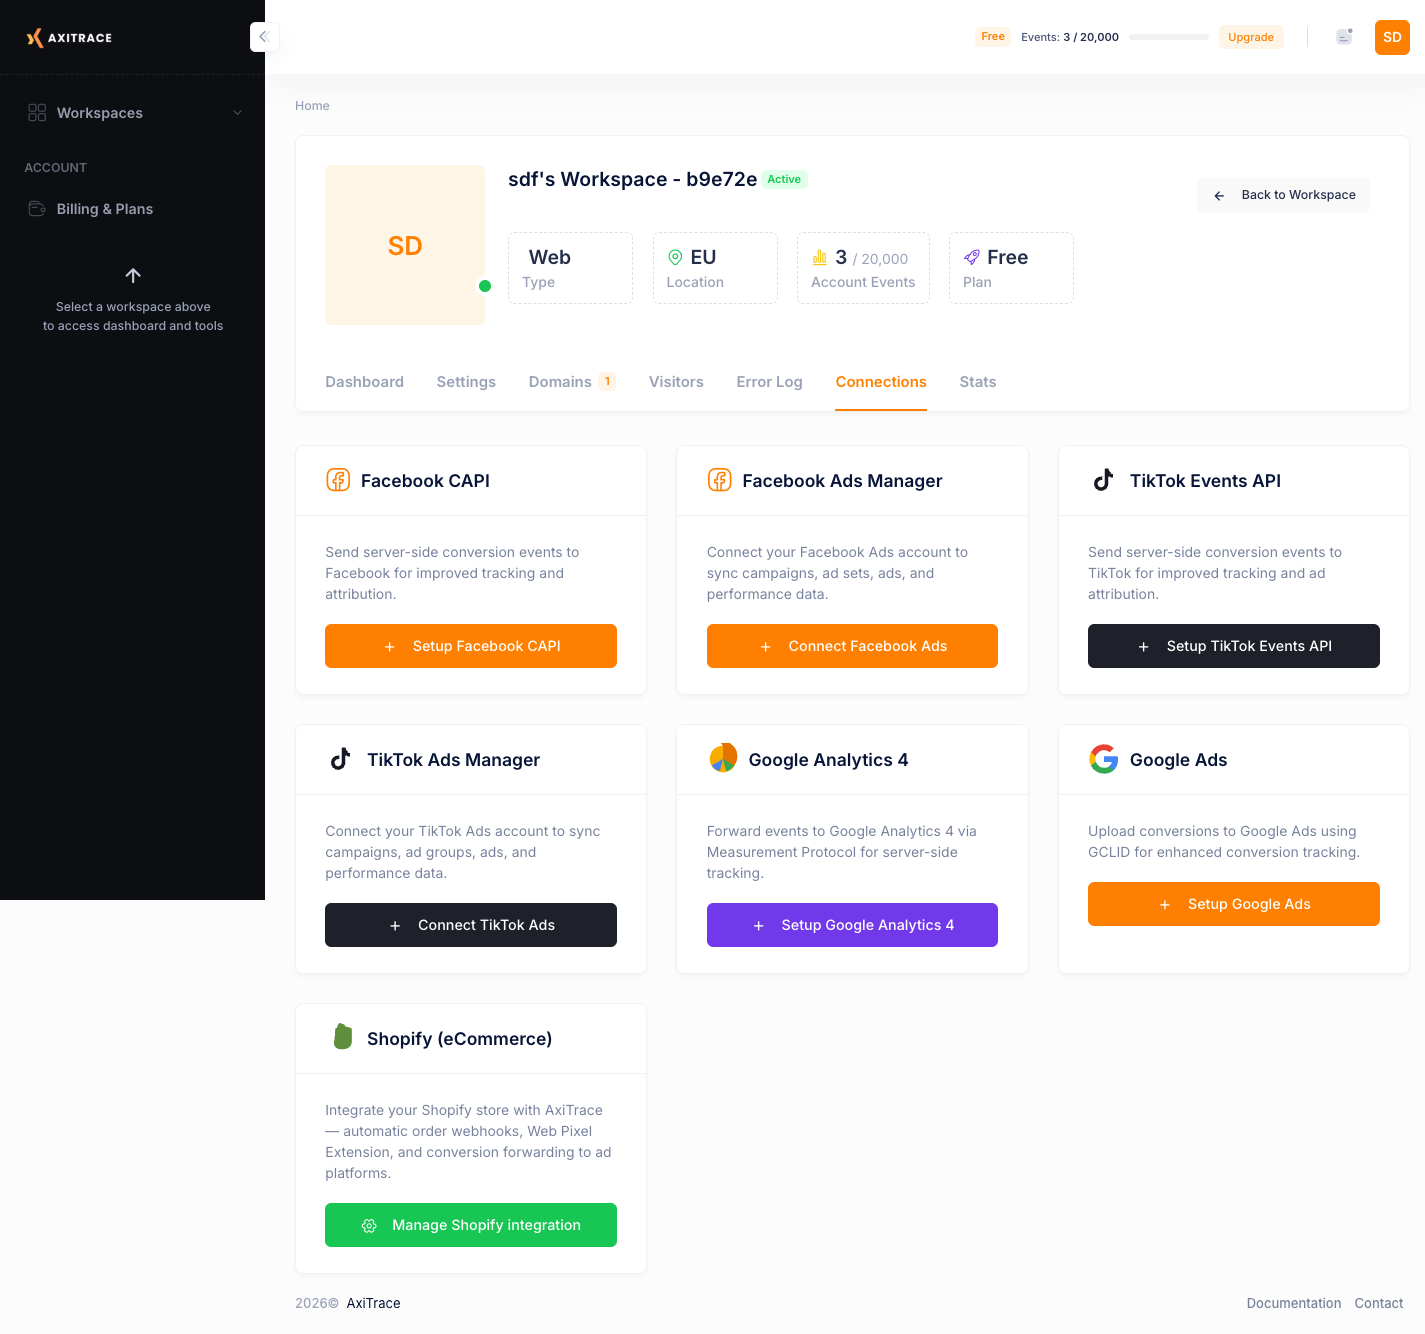
- Click Connections in the sidebar and open the Store tab.
- Find the Shopify (eCommerce) card and click Manage Shopify integration.
Enter your Shopify store domain
On the next screen (“Connect Shopify store”) you will see a single form field plus a summary of what is about to be configured.
- Type your store domain into the Shopify store domain field. Either format works:
mystore.myshopify.com- full domainmystore- just the store name (the.myshopify.comsuffix is added automatically)
- Click Connect to Shopify.
The install screen lists three items AxiTrace will set up after authorisation:
- Order webhooks -
orders/paid,checkouts/create - Web Pixel Extension - in-browser event tracking
- GDPR webhooks - Shopify Partner Agreement compliance (
customers/data_request,customers/redact,shop/redact)
Authorize AxiTrace in Shopify
You are redirected to Shopify’s standard OAuth authorisation screen. It shows the list of permissions AxiTrace needs.
The four scopes AxiTrace requests at install
-
read_ordersReceive theorders/paidwebhook and read order data for conversion tracking (order ID, total value, currency, line items, customer email for hashing). -
read_checkoutsReceive thecheckouts/createwebhook for cart and checkout-initiation tracking. -
write_pixelsRequired to install and update the AxiTrace Web Pixel Extension via Shopify’s GraphQLwebPixelCreatemutation. -
read_customer_eventsRequired for the Web Pixel Extension to receive Shopify’s sandboxed customer-event stream (page_viewed,product_viewed,product_added_to_cart, etc).
One optional scope: read_products
The install screen never asks for it. Shopify shows a separate approval for read_products only when you click Connect product costs on the Profit tracking card in Workspace settings → Profit & POAS. AxiTrace then reads the cost per item of each product variant (read-only) four times a day, so Profit and POAS use your real product costs. If you never connect product costs, your scopes stay exactly as installed. You can remove the permission at any time in Shopify; AxiTrace then stops the sync and the card offers to reconnect.
The app does not ask for write_orders, read_customers, read_inventory, or any payment scopes, and asks for read_products only if you connect product costs. It cannot edit your orders, your products or refund customers. The four install scopes above are the minimum needed for read-only conversion tracking.
Review the permissions and click Install app on the Shopify screen. Shopify redirects you back to AxiTrace.
Confirm the connection
After Shopify hands you back, AxiTrace runs the install sequence: exchange OAuth code for an access token, persist the encrypted token, register webhooks (they were declared in shopify.app.toml, so Shopify wires them automatically), and call webPixelCreate to install the Web Pixel with your workspace public key as its accountID.
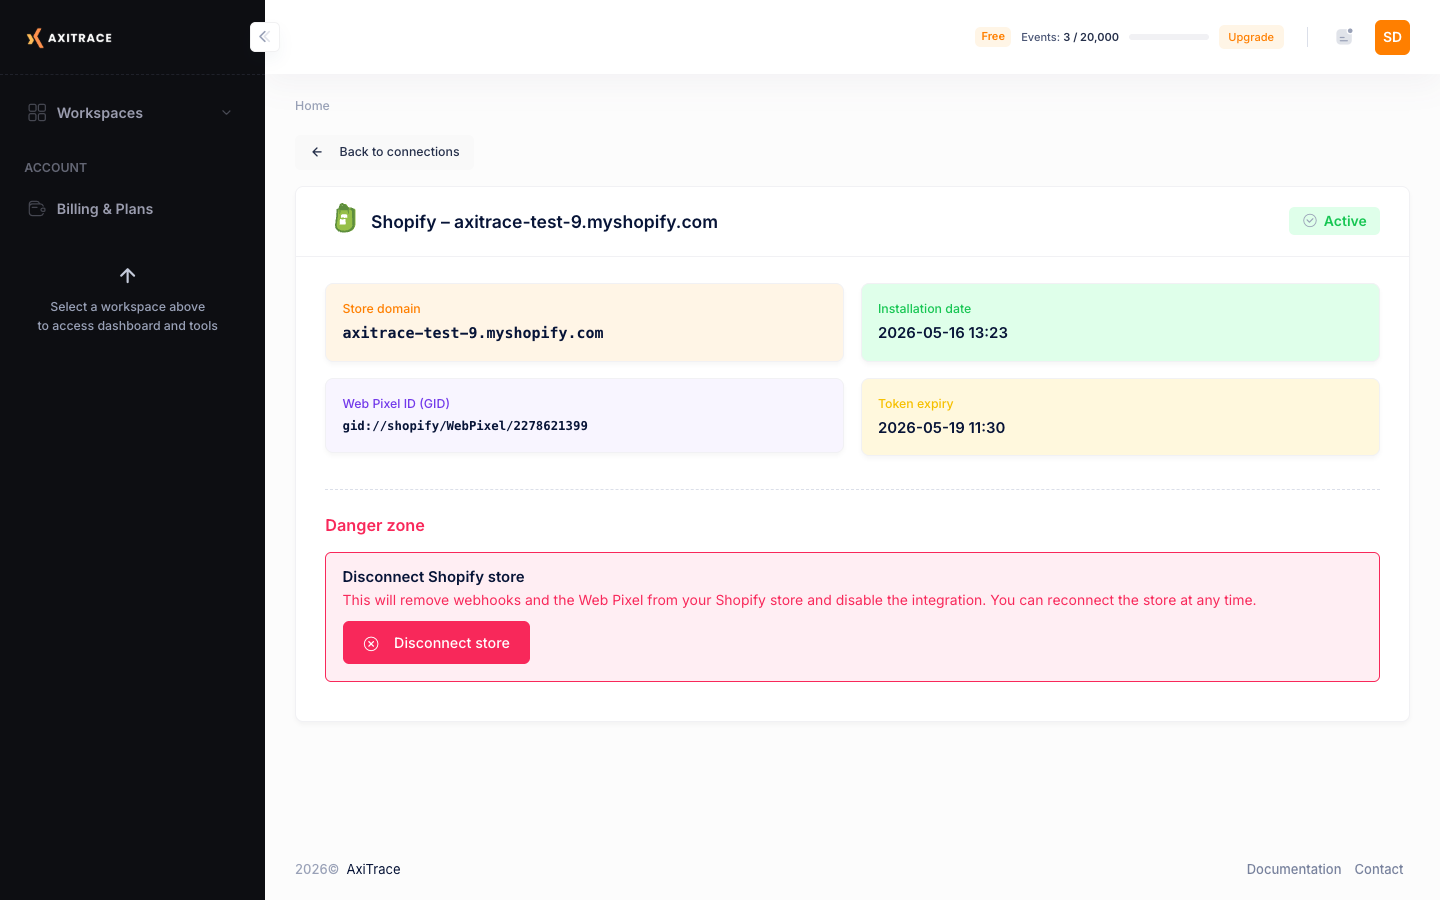
When that is done, you land on the Shopify Settings page showing four tiles plus a status badge.
Status badges
| Badge | What it means |
|---|---|
| Active | Install completed. Webhooks and Web Pixel are live. Events should be flowing. |
| Installation in progress | OAuth callback received, but webhook registration or pixel creation is still running. Usually transient - refresh after a few seconds. |
| Inactive | The store was disconnected (either by you, or because the app/uninstalled webhook fired). Reinstall to reactivate. |
| Error | Part of the install failed. A “Installation incomplete” banner appears with a Retry installation button. |
Place a test order
To confirm events are flowing end-to-end, place a real order with a low-impact payment method (Shopify’s Bogus Gateway works well for dev stores; for live stores use a manual payment method like Cash on Delivery or Bank Deposit).
- Open your storefront in a fresh incognito window.
- Browse a few products, add one to cart, go to checkout, complete the order.
- The Web Pixel fires
PageView→ViewProduct→AddToCart→InitiateCheckout→AddPaymentInfo→Purchasein sequence. Server-side, thecheckouts/createandorders/paidwebhooks deliver the checkout and order details to AxiTrace within seconds.
To stitch a visitor across pageviews, the pixel writes three localStorage keys (with cookie fallback if the Shopify sandbox blocks localStorage):
_axi_uid- visitor ID, 2-year TTL_axi_sid- session ID, 30-minute sliding window_axi_sid_exp- session expiry timestamp
Verify events in your dashboard
- Go to your AxiTrace workspace at axitrace.com/admin.
- On Overview, your visitor count and event total should tick up within seconds.
- Visitors shows the test session with full event timeline: PageView → ViewProduct → AddToCart → InitiateCheckout → AddPaymentInfo → Purchase, plus the transaction details (order ID, total, currency, line items).
- If you have ad-platform connections set up (Facebook CAPI, TikTok, Google Ads, GA4), AxiTrace forwards the Purchase event to each within ~1 second. Check your platform’s Events Manager / Diagnostics view to confirm deduplicated server-side conversions.
What gets tracked
The AxiTrace Web Pixel subscribes to seven Shopify customer events. The server-side webhooks add an authoritative InitiateCheckout from checkouts/create and an authoritative Purchase from orders/paid, so even if the pixel was blocked by an ad blocker, both signals are still captured.
| Shopify event | AxiTrace event | Source |
|---|---|---|
page_viewed | PageView | Web Pixel (client) |
product_viewed | ViewProduct | Web Pixel (client) |
product_added_to_cart | AddToCart | Web Pixel (client) |
checkout_started | InitiateCheckout | Web Pixel (client) |
payment_info_submitted | AddPaymentInfo | Web Pixel (client) |
checkout_completed | Purchase | Web Pixel (client) |
search_submitted | Search | Web Pixel (client) |
| - | InitiateCheckout (authoritative) | Webhook checkouts/create (server) |
| - | Purchase (authoritative) | Webhook orders/paid (server) |
The client and server InitiateCheckout events share a deterministic event_id derived from the Shopify checkout token, and the client and server Purchase events share one derived from the order ID - so Facebook CAPI, TikTok Events API and Google Ads deduplicate each pair automatically instead of double-counting.
How purchases are captured and attributed
Every paid order reaches AxiTrace through two independent paths, and only one copy is kept:
- Web Pixel (browser) - the
checkout_completedevent fires on the thank-you page, carrying the visitor ID, session ID, and the full browsing context of the buyer. - Server-side webhook - Shopify delivers
orders/paiddirectly to AxiTrace the moment the order is paid, with no browser involved at all.
Both events carry the same deterministic event_id (derived from the Shopify order ID), so whichever arrives second is discarded as a duplicate - you never see the same order counted twice, and ad platforms receive exactly one deduplicated conversion.
Why the webhook path matters
The pixel Purchase can be missing for legitimate reasons: an aggressive ad blocker, or a redirect payment method (bank transfer, BLIK, PayPal and similar hosted gateways) where the buyer closes the tab after paying and never loads the thank-you page. In those cases the orders/paid webhook is the only record of the sale - without extra care it would arrive with no browser identity and show up as a “transaction with no history”.
AxiTrace closes that gap in two ways:
1. The webhook order is enriched from Shopify’s own order data
Shopify records the buyer’s browser context server-side on every order. AxiTrace extracts it from the orders/paid payload:
- Buyer’s IP address and user agent (from the order’s
client_details) - also used to derive the device type (mobile / desktop). - Landing URL (the order’s
landing_site) - including any UTM parameters and ad click IDs (utm_source,utm_medium,utm_campaign,fbclid,gclid,ttclid,msclkidand others) that were on the first URL the buyer opened. - Referrer (the order’s
referring_site).
So even a purchase captured only server-side still tells you which channel and campaign it came from.
2. The webhook order is linked to the buyer’s browser profile
Before storing a webhook order, AxiTrace tries to attach it to the existing browser profile of the same visitor, using these signals in order of confidence:
| Signal | How it matches |
|---|---|
checkout_token |
Shopify assigns every checkout a unique token. The pixel’s InitiateCheckout event and the orders/paid webhook both carry it - an exact, one-to-one match. |
cart_token |
The pixel sends the visitor’s cart token with every event; the order webhook carries the same token as cart_token. Matches even when the buyer never reached a tracked checkout page. |
| IP + user agent | The order’s client_details are matched against the store’s recent page views (exact IP + user-agent match within 7 days, or IP-only within the last 2 hours). |
| A returning customer whose browser profile was already identified with the same email address. |
When a match is found, the order lands on the buyer’s existing profile - with their page views, add-to-carts, sessions and first-touch attribution intact. The same tokens also act as profile identifiers on the server, so if the pixel and webhook create records in either order, the profiles merge automatically.
Cart-token linking needs Web Pixel version 1.3.0+, which Shopify distributes to all connected stores automatically within minutes of release - there is nothing to update on your side. Orders placed while a visitor’s browser had no AxiTrace events at all (for example, before the app was installed) cannot be linked retroactively.
Consent and customer privacy
Whether the visitor’s banner decision gates AxiTrace is decided by one switch in your AxiTrace workspace: Workspace settings → Privacy & consent → Respect cookie consent. It is off by default, and the app pixel from version 1.9.0 reads it at runtime, so you never configure consent inside Shopify for AxiTrace. Changes take effect within 5 minutes. The full picture is in the Cookie consent guide.
| Respect cookie consent | What the app pixel does |
|---|---|
| Off (default) | The pixel sends events for every visitor, regardless of what they choose (or ignore) in your cookie banner. Your traffic numbers reflect all visitors, not just the ones who clicked “Accept”. |
| On | The pixel sends no event to AxiTrace before the visitor allows marketing, and none at all after a refusal. Events that happen while the banner is still open are held in memory and sent once the visitor accepts, so a purchase made during that window is not lost. |
- The pixel always loads, and always writes its identifiers. It declares to Shopify that it requires none of the analytics, marketing, preferences or sale-of-data purposes, so Shopify’s pixel manager never withholds it.
_axi_uid,_fbpand_fbcare therefore written for every visitor exactly as before, even while the consent gate is closed. They are first-party identifiers of a browser and they leave the store only with an event; keeping them is what makes a visitor who accepts on the next page the same visitor rather than a new one. - Shopify replays what it held. In regions where consent is required, Shopify executes app pixel callbacks only after consent is given and then replays the events the visitor already generated, so a late acceptance still produces the full journey.
- The server-side
orders/paidwebhook is delivered by Shopify’s infrastructure and is never affected by browser consent banners or ad blockers. When the order can be matched to a pixel session, it inherits that session’s consent state. - Shopify’s mandatory GDPR webhooks (
customers/data_request,customers/redact,shop/redact) are registered on install, so data-subject erasure requests are honoured automatically.
Shopify raises orders from its own servers - paid orders, point of sale and draft orders - and those can never carry the buyer’s banner decision. Because of that, a workspace with a Shopify store connected has Forward events that do not report a consent state switched off by default, and the AxiTrace admin panel asks you to confirm before you turn it on.
One Shopify-specific limitation follows from the same fact: an order placed by a visitor who refused in your banner reaches the server with no consent state rather than an explicit refusal. While the switch is off that order is not forwarded to any ad platform, but it is not stripped of identifiers either - the click IDs captured on the landing page stay with that order inside AxiTrace reporting.
AxiTrace processes visitor data on your behalf as your analytics provider. Make sure your store’s privacy policy discloses first-party analytics, and configure your consent setup according to the legal requirements that apply to your business and region. If your legal counsel requires analytics to be blocked for non-consenting visitors, contact us at info@axitrace.com before installing.
Web Pixel versions before 1.3.0 used Shopify’s default privacy declaration, which made Shopify block the pixel until the visitor granted full consent. On stores with a consent banner this silently hid up to half of all visitors and produced purchases with no browsing history or attribution. If you saw traffic drop or “orphan” transactions in that period, this was the cause - it is fixed for all stores as of pixel 1.3.0 (released 2026-07-12), with no action needed on your side.
First-party tracking domains
By default the Web Pixel sends events to https://stat.axitrace.com/shopify/pixel. Since July 2026 you can route them through your own subdomain instead (e.g. https://axi.yourshop.com/shopify/pixel), which makes tracking requests first-party to your brand and more resilient against third-party blocklists.
How to enable it
- In your AxiTrace workspace, add a custom tracking domain (e.g.
axi.yourshop.com) and point it atstat.axitrace.comwith a CNAME record - the full walkthrough is in Domain Configuration. - Once the domain’s status turns Verified, AxiTrace automatically updates the Web Pixel settings on every Shopify store connected to that workspace - no reinstall, no theme changes, nothing to do in Shopify Admin.
The pixel uses the workspace’s CNAME-verified tracking domain (the one marked as default, if you have several). If the workspace has no verified domain, the pixel uses the shared stat.axitrace.com endpoint. Important: once a custom domain is live, keep its CNAME record in place - if the DNS record is removed, pixel events will silently fail to deliver until the record is restored or the domain is removed from the workspace.
Even without a custom domain, Shopify stores are in a good position because:
- Server-side webhooks (
orders/paid) bypass the browser entirely - an ad blocker on the checkout page cannot strip these. - The pixel runs inside Shopify’s sandboxed Web Pixel runtime and uses
sendBeacon(), which is less exposed to blocking than classic third-party script tags.
If you also embed the AxiTrace JavaScript SDK on a non-Shopify page (a marketing landing page, a blog), the SDK uses the same verified tracking domains - see Domain Configuration.
Disconnecting and reconnecting
To remove AxiTrace from your Shopify store, open Connections → Store → Shopify in AxiTrace and scroll to the Danger zone section.
Clicking Disconnect store shows a confirmation: “Are you sure you want to disconnect this Shopify store? Webhooks and the Web Pixel will be removed.”
Confirming will:
- Call Shopify’s GraphQL
webPixelDeleteto remove the Web Pixel from your store. - Unregister all webhook subscriptions for this store.
- Mark the integration as Inactive in AxiTrace.
The historical orders and events stay in your AxiTrace dashboard - only future tracking stops. You can reconnect later by clicking Connect Shopify store and re-authorising the same shop.
You can also uninstall the app from Shopify Admin → Settings → Apps and sales channels → AxiTrace → Uninstall. Shopify will fire the app/uninstalled webhook, which AxiTrace handles by setting the store to Inactive, revoking the cached access token, and stopping all forwarding. No manual cleanup needed on the AxiTrace side.
Troubleshooting
The install screen says “Installation incomplete” with a Retry button
This happens when one of the post-OAuth steps failed - usually webhook registration or pixel creation. The most common causes:
- Shopify API rate limit hit during a burst of installs - retry usually fixes it instantly.
- Web Pixel scope rejection - the store owner didn’t grant
write_pixelsorread_customer_events. Re-run the install and approve every requested scope. - Network error to Shopify Admin GraphQL - very rare; retrying after 60 seconds resolves it.
Click the Retry installation button on the settings page. It re-runs the pixel install and webhook registration without going through OAuth again.
I see no events in AxiTrace after a test order
Check in this order:
- Status badge is Active, not Installation in progress.
- In your Shopify Admin, open Online Store → Customer events - the AxiTrace pixel should be listed and enabled.
- Try the order in a regular (non-incognito) window to rule out Shopify storefront cookie issues with cross-site cookies.
- Check Settings → Notifications → Webhooks in Shopify - the AxiTrace webhooks should be listed with green OK badges, not red errors.
The store is “already connected to another workspace”
ecommerce_stores table (no duplicates allowed).
Token expiry shows a date in the past
Web Pixel ID (GID) is empty / shows “None (pixel not installed)”
webPixelCreate didn’t run successfully - usually because write_pixels was not granted. The status badge will read Error. Click Retry installation on the settings page, and on the Shopify approval screen tick every requested scope.
Order events are duplicated in my ad platform
event_id, so each platform counts conversions twice. Either remove the Shopify-native channel or disable its conversion forwarding.
A transaction shows up with no page views or attribution (“orphan” profile)
This means the order was captured only by the server-side orders/paid webhook and could not be linked to any browser activity. With current versions this should be rare - see How purchases are captured and attributed for all the signals AxiTrace uses to link webhook orders to browser profiles. Remaining legitimate cases:
- The buyer’s browser sent no events at all - e.g. an aggressive ad/script blocker for their entire visit, or an order created outside the storefront (draft orders, phone orders, other sales channels).
- Orders from before the app was installed - there is no browser history to link to.
- Historical orders from before pixel 1.3.0 (released 2026-07-12) - older pixel versions were blocked by Shopify for visitors who had not accepted the consent banner, so those buyers have no browser trail. This cannot be repaired retroactively, but does not affect new orders.
Even orphan transactions still carry channel attribution recovered from the order itself (landing URL with UTMs and click IDs, referrer, device) - see the same section above.
FAQ
Is the app on the Shopify App Store?
Does the app slow down my checkout?
sendBeacon(), which fires asynchronously and survives page navigation. Server-side, the orders/paid webhook is processed entirely outside the checkout flow.
What about GDPR / data subject requests?
customers/data_request, customers/redact, and shop/redact. A customer data-erasure request from a Shopify merchant is automatically handled by the AxiTrace event-worker, which deletes the customer’s profile, hashes, and event history from ClickHouse within Shopify’s 30-day SLA.
Can I use one Shopify store with multiple AxiTrace workspaces?
shop_domain column on ecommerce_stores is unique). If you need different ad-platform connections for different campaigns, set up multiple ad-platform connections inside the same workspace instead.
Does this work alongside Shopify’s native Facebook / TikTok / Google channels?
event_id, so platforms cannot deduplicate and you will over-report conversions. Keep AxiTrace as the single source of truth for server-side conversion delivery.
I already use the JavaScript SDK on my blog - do I need both?
vt_vid on the SDK side, _axi_uid on the pixel side) get stitched on the server when they share an email or Shopify customer ID.
Will the Shopify pixel respect customer consent banners?
orders/paid webhook is delivered by Shopify and is never blocked in the browser; when it cannot be matched to a pixel session it arrives with no consent state, which your workspace forwarding setting decides on. Data-subject erasure requests are honoured automatically via Shopify’s GDPR webhooks. See Consent and customer privacy for the full picture and your responsibilities.
Need Help?
If you have questions or hit a wall:
- Email us at info@axitrace.com - we typically reply within one business day.
- If you also need to wire AxiTrace into a non-Shopify part of your site, see the JavaScript SDK guide.
- Suspect double-counting in Facebook Ads Manager? Open the Pixel Deduplication guide.